In this guide, android app development India experts will explain the use of Fingerprint API in android development project. You can follow the steps shared by them in this post for best results.
From Android 6.0 (M) Google provides Fingerprint API for user authentication. Fingerprint API uses device inbuilt touch sensor for authenticating user.

For Fingerprint authentication to work:-
- User’s device lock screen must be protected either by PIN or Pattern or Password.
- User must have registered one fingerprint.
This two points can be checked programmatically using KeyguardManager and FingerprintManager.
Create a new project in Android Studio, enable Phone and Tablet and set Minimum SDK to API 23.
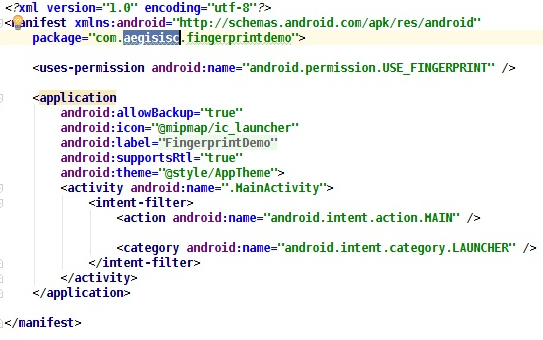
Firstly add Fingerprint permission to Manifest File.
For designing UI for authentication, Google recommends on developer page (https://developer.android.com/about/versions/marshmallow/android-6.0.html#fingerprint-authentication) to use the Fingerprint icon they provide, which can be downloaded from here.(http://www.ebookfrenzy.com/code/ic_fp_40px.png).
Its time to setup UI, we will keep it simple. Open activity_main.xml and drag & drop image view at center of the layout and set the src to the Fingerprint icon. Drag and drop a textview and place it below image view and set label Touch Sensor. UI will look something like this:-

Now open MainActivity class, edit OnCreate method, initialize and obtain references for KeyguardManager and FingerprintManager,
|
|
public class MainActivity extends AppCompatActivity {


privateFingerprintManagerfingerprintManager;

privateKeyguardManagerkeyguardManager;


    @Override

protected void onCreate(Bundle savedInstanceState) {

super.onCreate(savedInstanceState);

setContentView(R.layout.activity_main);


keyguardManager = (KeyguardManager) getSystemService(KEYGUARD_SERVICE);

fingerprintManager = (FingerprintManager) getSystemService(FINGERPRINT_SERVICE);

    }
}
|
|
As noted earlier, Fingerprint authentication will only work if user have enabled lock screen protection to be either PIN or Pattern or Password and have registered one fingerprint, so we require to put a defensive code for checking this two conditions, for avoid application crashing and also have to check whether we have required permission to user Fingerprint authentication. This all checks we will perform right after initializing KeyguardManager and FingerprintManager.
|
|
        //Checking whether device lock screen protected by PIN or Pattern or Password.

if (!keyguardManager.isKeyguardSecure()) {


Toast.makeText(this, "Lock screen security not enabled in Settings", Toast.LENGTH_LONG).show();

return;
        }


        //Checking whether we have required permission.

if (ActivityCompat.checkSelfPermission(this,

Manifest.permission.USE_FINGERPRINT) !=

PackageManager.PERMISSION_GRANTED) {

Toast.makeText(this,

                    "Fingerprint authentication permission not enabled",

Toast.LENGTH_LONG).show();

return;
        }

        //Checking whether user have registered any fingerprint or not.

if (!fingerprintManager.hasEnrolledFingerprints()) {


            // This happens when no fingerprints are registered.

Toast.makeText(this, "Register at least one fingerprint in Settings", Toast.LENGTH_LONG).show();

return;
        }
|
|
We use KeyguardManagerisKeyguardSecure() method to check whether KeyGuard is secured by by PIN or Pattern or Password using. Then we check, whether we have required permission or not and finally using hasEnrolledFingerprints() method of FingerprintManager class we check whether user has registered at least one fingerprint on device or not. In either of these three checks if we get false response, display appropriate message to user and return from method.
Fingerprint authentication requires generation of encryption key which will be stored in device securely using Android Keystore system. For generating encryption key first application will require to gain access to Keystore. Add new method named generateEncryptionKey() in our code and inside it add code to access Keystore. Keystore instance can be accessed by getInstance() method of Keystore class and passing the identifier of Android Keystore container.
|
|
public class MainActivity extends AppCompatActivity {


privateFingerprintManagerfingerprintManager;

privateKeyguardManagerkeyguardManager;

privateKeyStorekeyStore;
    .
    .
    .
protected void generateEncryptionKey(){

try{

keystore = KeyStore.getInstance("AndroidKeyStore");

}catch (Exception e){

e.printStackTrace();

          }
      }
   }
|
|
Ones we have instance of Keystore, next we have to generate the key using KeyGenerator service by obtaining instance of KeyGenerator, passing the name of Key type to be generated and keystore container name where the key will be saved as argument.
|
|
public class MainActivity extends AppCompatActivity {


privateFingerprintManagerfingerprintManager;

privateKeyguardManagerkeyguardManager;

privateKeyStorekeyStore;
    .
    .
    .
protected void generateEncryptionKey(){
      .
      .      try {

keyGenerator = KeyGenerator.getInstance(KeyProperties.KEY_ALGORITHM_AES, "AndroidKeyStore");

}catch (NoSuchAlgorithmException e){

e.printStackTrace();

}catch (Exception e){

e.printStackTrace();;
        }
}
|
|
Now its time to generate the key which will be later on used for creating cipher to be used in encryption process. For generating key first we need to load Keystore and then init the Keygenerator using KeyGenParameterSpec.Builder class and passing the name of the key, purpose for which it will be used and other encryption parameters. Finally call keygenerator.generateKey() for generating the key.
Add below code to generateEncryptionKey() method after catch block of KeyGenerator.
|
|
public class MainActivity extends AppCompatActivity {


privateFingerprintManagerfingerprintManager;

privateKeyguardManagerkeyguardManager;

privateKeyStorekeyStore;

privateKeyGeneratorkeyGenerator = null;

private static final String ENCRYPTION_KEY_NAME = "android_fingerprint_demo_key";
    .
    .
    .
protected void generateEncryptionKey(){
      .
      .      .
      .
try {

keystore.load(null);

keyGenerator.init(new

KeyGenParameterSpec.Builder(ENCRYPTION_KEY_NAME,

KeyProperties.PURPOSE_ENCRYPT |

KeyProperties.PURPOSE_DECRYPT)

                    .setBlockModes(KeyProperties.BLOCK_MODE_CBC)

                    .setUserAuthenticationRequired(true)

                    .setEncryptionPaddings(

                            KeyProperties.ENCRYPTION_PADDING_PKCS7)

                    .build());

keyGenerator.generateKey();

        } catch (NoSuchAlgorithmException |

InvalidAlgorithmParameterException

                | CertificateException | IOException e) {

throw new RuntimeException(e);
        }
   }
|
|
Now we have key and it is time to create a cipher for creating encrypted FingerprintManager.CryptoObject instance which will be used for fingerprint authentication process. Add new method named createCipher and add code for generating cipher using the key we generated in this method
|
|
public class MainActivity extends AppCompatActivity {

    .
    .
    .

private Cipher cipher = null;


protected void createCipher(){

try {

cipher = Cipher.getInstance(

KeyProperties.KEY_ALGORITHM_AES + "/" + KeyProperties.BLOCK_MODE_CBC + "/"

                            + KeyProperties.ENCRYPTION_PADDING_PKCS7);

        } catch (NoSuchAlgorithmException |

NoSuchPaddingException e) {

cipher = null;

throw new RuntimeException("Failed to get Cipher", e);

        }

try {

keystore.load(null);

SecretKey key = (SecretKey) keystore.getKey(ENCRYPTION_KEY_NAME, null);

cipher.init(Cipher.ENCRYPT_MODE, key);

        } catch (KeyPermanentlyInvalidatedException e) {

cipher = null;

        } catch (KeyStoreException | CertificateException

                | UnrecoverableKeyException | IOException

                | NoSuchAlgorithmException | InvalidKeyException e) {

cipher = null;

throw new RuntimeException("Failed to init Cipher", e);
        }
    }
|
|
Now create FingerprintManager.CryptoObject.
|
|
public class MainActivity extends AppCompatActivity {


privateFingerprintManagerfingerprintManager = null;

privateKeyguardManagerkeyguardManager = null;

privateKeyStorekeystore = null;

privateKeyGeneratorkeyGenerator = null;

private static final String ENCRYPTION_KEY_NAME = "android_fingerprint_demo_key";

private Cipher cipher = null;

privateFingerprintManager.CryptoObjectcryptoObject;


    @Override

protected void onCreate(Bundle savedInstanceState) {

super.onCreate(savedInstanceState);

setContentView(R.layout.activity_main);

       .
       .
       .

generateEncryptionKey();

createCipher();

if (cipher != null){

cryptoObject = new FingerprintManager.CryptoObject(cipher);

        }
    }
}
|
|
With creation of FingerprintManager.CryptoObject, we are done with the basic setup required for implementing fingerprint authentication, now one last thing required is to add FingerprintManager.AuthenticationCallback, which will actually trigger the authentication.
Add new class named FingerprintAuthenticationHandler which extends
FingerprintManager.AuthenticationCallback and override all callback methods.
|
|
public class FingerprintAuthenticationHandler extends FingerprintManager.AuthenticationCallback{


publicFingerprintAuthenticationHandler() {

super();

    }


privateCancellationSignalcancellationSignal;

private Context appContext;


publicFingerprintAuthenticationHandler(Context context) {

appContext = context;

    }

public void startScanning(FingerprintManager manager,

FingerprintManager.CryptoObjectcryptoObject) {


cancellationSignal = new CancellationSignal();


if (ActivityCompat.checkSelfPermission(appContext,Manifest.permission.USE_FINGERPRINT) != PackageManager.PERMISSION_GRANTED) {

return;
        }


manager.authenticate(cryptoObject, cancellationSignal, 0, this, null);

    }


    @Override

public void onAuthenticationError(interrorCode, CharSequenceerrString) {

super.onAuthenticationError(errorCode, errString);

    }

    @Override

public void onAuthenticationHelp(inthelpCode, CharSequencehelpString) {

super.onAuthenticationHelp(helpCode, helpString);

    }

    @Override

public void onAuthenticationSucceeded(FingerprintManager.AuthenticationResult result) {

super.onAuthenticationSucceeded(result);

    }

    @Override

public void onAuthenticationFailed() {

super.onAuthenticationFailed();

    }
}
|
|
Now to start authentication process, make a call to startScanning method of FingerprintAuthenticationHandler fromMainActivity.onCreate().
|
|
public class MainActivity extends AppCompatActivity {


privateFingerprintManagerfingerprintManager = null;

privateKeyguardManagerkeyguardManager = null;

privateKeyStorekeystore = null;

privateKeyGeneratorkeyGenerator = null;

private static final String ENCRYPTION_KEY_NAME = "android_fingerprint_demo_key";

private Cipher cipher = null;

privateFingerprintManager.CryptoObjectcryptoObject;

    @Override

protected void onCreate(Bundle savedInstanceState) {

super.onCreate(savedInstanceState);

setContentView(R.layout.activity_main);
       .
       .
       .
if (cipher != null){

cryptoObject = new FingerprintManager.CryptoObject(cipher);

FingerprintAuthenticationHandlermFingerprintAuthenticationHandler = new FingerprintAuthenticationHandler(this);

mFingerprintAuthenticationHandler.startScanning(fingerprintManager, cryptoObject);

        }
    }
}
|
|
That’s all, we are done with the coding part and it’s time to run the application. If you implemented the code as described in this post, then your application should run properly.
Android app development India based professionals have just shared a guide to explain the use of Fingerprint API. For more details or queries related to the subject, you can ask in comments.
I write technical articles especially for iOS, Android and Xamarin mobile app development. Analyse on Cross Platform Apps and interested to learn android app development.
Latest posts by Rosina De Palma (see all)


