


Image Credit: CRGroup
Every trade has a secret and so does every professional. You would know what I mean if you have ever interacted with your colleagues regarding shortcuts to completing work. You can use simple keyboard combinations in Microsoft Word to quickly complete work or use inbuilt features in Microsoft Dynamics 365 to replicate changes at multiple instances to avoid rework. Knowledge of these simple tricks can make a big difference in your routine task and can also help you leave an impression.
Today, I will explain how to add help section in CRM entity form, which is useful while working on multiple forms.While working on large forms or multiple forms, at some point of time, we might need to guide the user about the form, so the user can use it easily.
Here, I am going to show two different ways for adding help:
- Every form which has multiple fields, we need give proper definition to every field. For this, we need to follow certain steps.
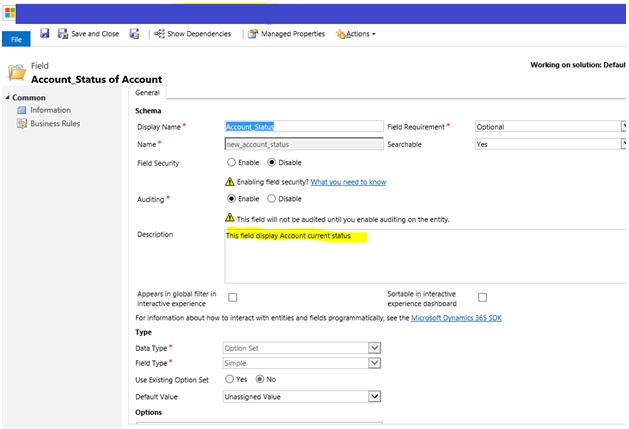
1). Let us suppose, we need to create one new field namely Account_Status in account entity. In this case, user needs to identify, what is the main purpose of that field?
For creating a new field, follow the below path, SettingàCustomizationàEntityàAccountàFields , when you are creatinga new field, add a proper description according to the image,add this field in the account form, then save and publish the customization.
For this please refer the below image-
2). After completing the 1st step, when you create a new record in account entity, and when you hover the mouse cursor to that field it will display field description.
See the below image-

- Another way is,suppose we have the requirement to provide help URL or website link to user, where all the solutions are available-
In that case, we need to do some internal settings-
Follow the below path, settingàadministrationàSystem settingàclick on the general tab,
In custom help url section, we need to select Yes, for Usecustom help for customizable entities,
And provide required URL in Global custom help URL section.
For this please refer the below image-

After this step, we need to do some entity specific settings-
Just follow the below path—
CustomizationàEntityàAccountàdouble click on account entity
Here you need to check the custom help check box, and provide the required URL, then Save and publish the customization-
For this please refer the below image-

When all the setting is completed go to the account entity form here a“?” icon will be displayed.
See the below image-

When you click on that icon, it will redirect you to the help url which you provided previously-

These two simple ways can help you customize settings and enhance user experience. Follow these steps and share your experiences with me. Additionally, if you are dynamics crm developers and have any queries on this topic, post it in the comments section.
Ethan Millar
Latest posts by Ethan Millar (see all)
- The Future Of Machine Learning And Data Science - September 26, 2017
- Easy Way to Add Help Section in CRM Entity Form - July 28, 2017
- Customized Deployment for Spring Boot Applications - June 2, 2017